Printing
All My Books prints two different things: one book card, or the whole
collection as a report. Both use the same window and the same set of templates
in the reports_html folder — the card templates and the
collection templates are simply kept apart.
Printing a book card
Select the book and choose (Ctrl+Alt+P). The window opens with the three card templates — Card, Card Compact and Card Cover — and a preview of the current book. The arrows at the top page through the collection, so you can check several cards without closing the window. Print, or save the card as PDF or HTML.
Printing the collection
- Filter the collection down to what you want on paper — only visible books are printed.
- Choose (F7).
- Pick a Report template. The preview redraws as you change it; the arrows page through the report, and the zoom box switches between fit-width, whole page and fixed zoom.
- Click Print…, or Save to PDF…, or Save to HTML….
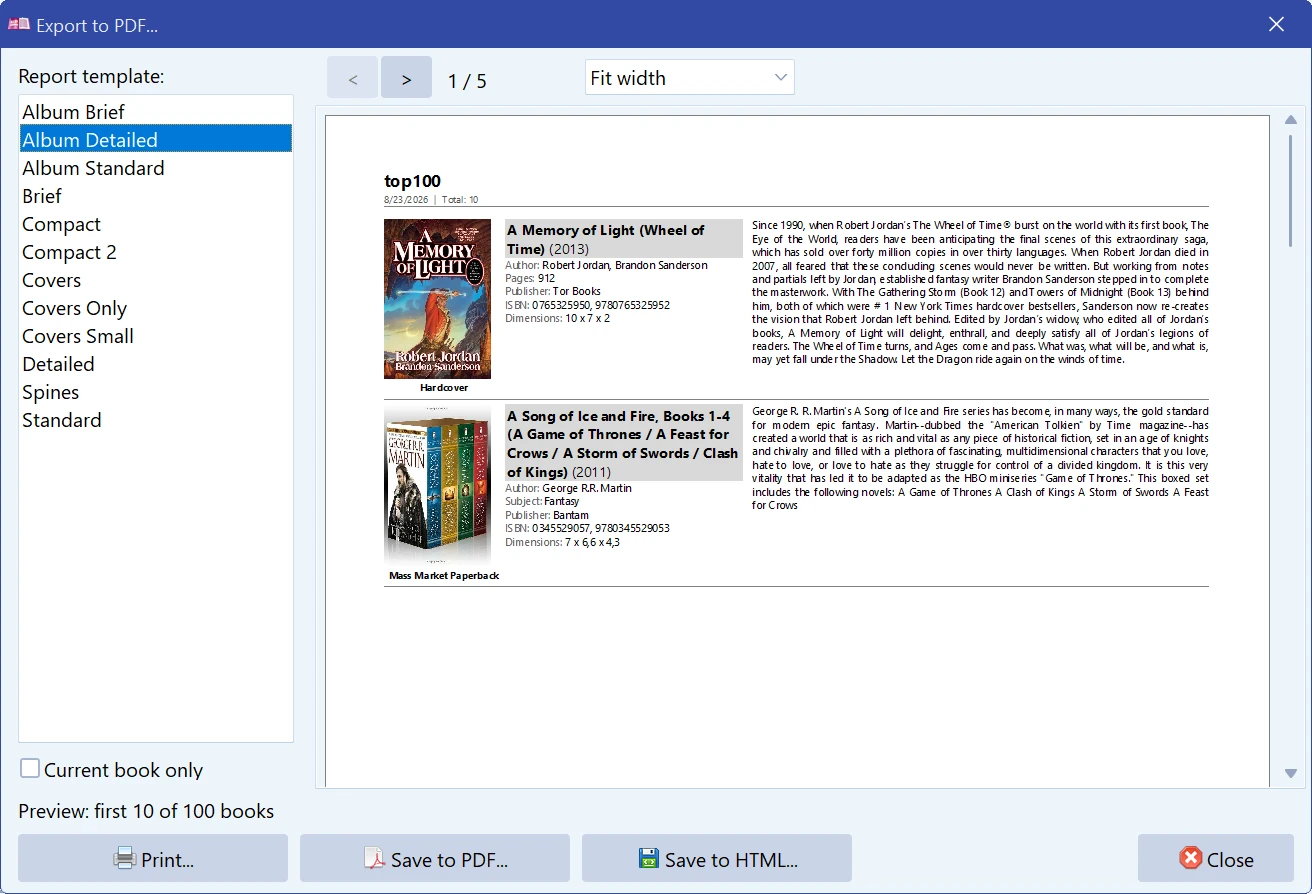
Report templates
Twelve templates cover the collection, and they fall into two kinds:
| Compact, Compact 2, Brief, Standard, Detailed | Text lists, from one line per book to full details. What you want for an inventory or an insurance list. |
| Album Brief, Album Standard, Album Detailed, Covers, Covers Small, Covers Only, Spines | Cover-led layouts — a picture catalog of the collection. |
The remaining three, Card, Card Compact and Card Cover, are the single-book layouts and appear only when you print a card.
Current book only limits a collection report to the selected book.
The design of the card on screen is a different
thing: it comes from
and the templates in the bookcards folder. Changing it does not
change what comes out of the printer.
Print to PDF rather than to paper when you want to keep a copy: the same templates, no ink, and a file you can e-mail. Other export formats are in Exporting.
Making your own report template
A template is not a closed format: it is three HTML files in a folder, and anything you can write in HTML you can print. Version 5 had a visual report designer instead. It belonged to the old printing engine, hardly anyone ever opened it, and it could not be carried over to the current codebase — so plain HTML took its place. Fewer buttons, rather more control.
Templates live in the program folder, in reports_html —
usually C:\Program Files (x86)\AllMyBooks\reports_html.
One subfolder is one template, and the name of the folder is exactly what you see
in the template list. Inside are three files:
| header.html | The start of the document — <head>, the report
heading and all the CSS. Printed once, at the top. |
| book.html | The block for one book. Printed once per book, in the order the collection is sorted in. |
| footer.html | The end of the document, usually nothing but the closing tags. |
- Copy one of the stock folders —
Briefis an easy starting point,Compactif you want a table — and rename the copy to whatever the template should be called in the list. - Edit the files in any text editor and save them as UTF-8.
- Open again. The new name is in the list, and the preview shows the result page by page, exactly as it will come out of the printer.
About administrator rights. Program
Files is a protected folder, so Windows will ask for confirmation when you
copy a template folder into it, and a plain text editor will simply refuse to save
there. Two ways round it: start the editor as administrator
(right-click › Run as administrator) and open the
file from there, or — usually easier — build the template in a folder
of your own, say on the Desktop, and copy the finished folder into
reports_html, confirming the prompt Windows shows. If you installed
All My Books somewhere outside Program Files, none of
this applies.
Copy a template instead of editing one that ships with the program. An update rewrites the stock folders and your changes to them would go with it, while a folder under a name of your own is never touched.
A folder appears in the list only if it contains book.html. Names
that start with Card go to the card window instead of the collection
report.
Fields
Book data goes into the template as placeholders that look like HTML comments.
Mind the space before -->:
<div class="bktitle"><b><!--#row -->. <!--#title --></b></div>
<div><!--#authors --></div>
<div><span class="lbl"><!--#publisher_lbl -->:</span> <!--#publisher --> <!--#year --></div>
<div><!--#cover width="85" --></div>
| Placeholders | What they print |
|---|---|
| title, originaltitle, subject, synopsis, comments, contents |
Title, original title, genre, synopsis, your comments, table of contents. |
| authors, editors, translators, illustrators |
The people, already joined into one line. |
| publisher, year, yearp, language, pages, isbn, binding, dimensions, circulation |
Publication data. yearp is the year in brackets, and prints
nothing when the year is unknown — handy for headings like
Title (1979). |
| series, volume, booknumber | The series, the volume in it and your own numbering. |
| rating, myrating, unread, wishlist, dateread, personalmarks |
Ratings and marks. The yes/no ones print a translated «Yes» when set, and nothing at all when not. |
| price, filesize, playtime, location, lentto, dateadded, url, loc, dewey, bookid |
Everything else stored with the book. Empty values print as nothing, not as a zero. |
| cover | The cover. This one expands into a whole <img> tag, so
give it the size you want: <!--#cover width="85" -->.
Books without a cover print nothing. |
| ud_<name> | One of your own fields — <!--#ud_Shelf --> for a
custom field called Shelf. Works for field names without spaces. |
| reporttitle, date, totalbooks, row |
The report itself: the database name, the current date, how many books are
in the report, and the number of the book being printed. The first three
belong in header.html, row in
book.html. |
Every field that has a caption in the program also has a label placeholder:
add _lbl to the name and you get that caption translated into the
interface language — <!--#pages_lbl --> prints
Pages in English and Seiten in German. Write your labels this way
and the template works in every language the program is translated into.
Two attributes can be added inside a placeholder:
| maxlen=200 | <!--#synopsis maxlen=200 --> cuts a long value at a
word boundary and adds an ellipsis. Useful when a layout has to fit on one
page. |
| skipsame | <!--#originaltitle skipsame --> prints nothing when
the value is the same as the title — which, for most books, it is. |
Page setup and empty fields
Four directives control the printed page. Put them anywhere in the template; they are stripped from the output:
| <!--#option crop-empty-lines --> | Drop a line of the template completely when all the fields on it came out empty. Without it, a book with no series prints an empty Series: line. |
| <!--#option landscape --> | Ask for landscape paper. The cover-led templates use it. |
| <!--#option paper a4 --> | Ask for A4 — for layouts whose physical size matters. |
| <!--#option margins 8 --> | Page margins in millimetres. The default is 15. |
Cropping works on whole lines of the template file, not on single placeholders. Two fields written on the same line stand or fall together, so give each field a line of its own if you want them dropped independently.
Page breaks are ordinary CSS. page-break-inside: avoid on the
book block keeps a book from being split across two pages, and
page-break-before: always starts a new page — that is all the
stock templates use. Sizes given in mm come out exact on paper, so
use millimetres when the physical size matters; sizes in pixels are exact only at
96 dpi.
The print engine is not a web browser. It renders a practical subset of HTML and CSS — tables, fonts, colours, borders, margins, images, floats — but not modern layout such as flexbox or CSS grid, and no JavaScript. Build the layout the way the stock templates do, with tables and simple CSS, and the preview will show you exactly what prints.
You do not have to know HTML for this. Open a stock template, paste the contents into ChatGPT, Claude or any other assistant and describe the change you want — «add the date read», «put the cover on the right», «make it two columns». Save the answer into your own template folder, and the preview tells you at once whether it worked; if it went wrong, delete the folder and nothing is lost. And if you would rather not fight with it at all, describe the report you need on the feedback form and we will put the template together for you.
Free to try. Catalog up to 100 books at no cost, forever.