Tutorial for Image Comparer
If you are using Image Comparer v2.x refer to tutorial by Tom Morrissey.
Here we will review Image Comparer by Bolide Software. This software is intended to find similar images (or exact duplicates). It will be useful for those who collect various images and will help them get rid of duplicates or images with lower quality. Also, the program can be used when capturing series of images to select images with best quality. Ok, let's proceed.
At each program startup (if the corresponding checkbox is not cleared), "Comparison Wizard" will be displayed. It can be used to quickly perform a search for duplicates or similar images.
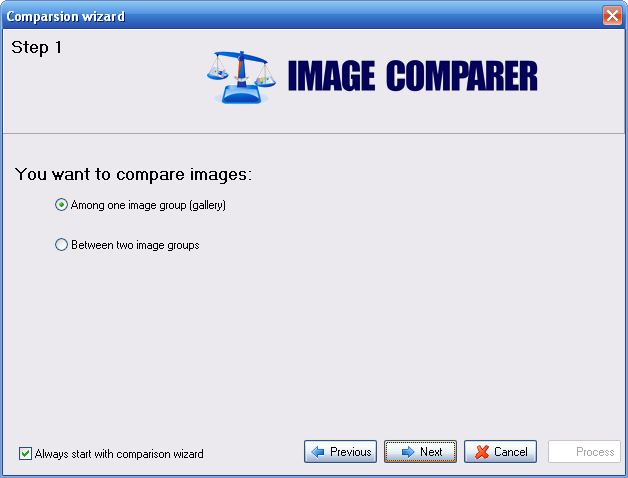
Depending on the result you want, select one of the two items. The programs uses the term "Gallery" to denote a set of images, which can be located in the same or different folders. When comparing images inside a single gallery, the program will compare each image with all other images. When searching between two galleries, the program will compare each image of the first gallery with all images of the second gallery and no search inside galleries will be performed. Galleries are a convenient tool to gather images, located in different folders, in a single place.
Now the second step. For the sake of example, let's say we want to find similar images within a single gallery (two galleries involve similar actions). The program will prompt you to enter the name for the gallery and add images to it.

After you have added images to the gallery, the program will ask you what images you want to find. Then, select the folder where results will be stored and press "Process". The program will index images and perform search according to the specified criteria. Now you can at any time open the stored comparison results and saved galleries.
Instead of using the comparison wizard, you can create galleries manually. To do this, select the "Create gallery" item in the "Gallery" menu or press this icon: ![]() . Then, select the folder you want to add to the gallery and enter the gallery name. The selected images will be indexed and preview images will be displayed on the screen. You can add or remove images from the gallery. To add images, invoke the context menu (by right-clicking on any of the images) and select the "Add image to gallery" item. Then you can add one or several images. To add a folder, select the "Add folder to gallery" item. In the dialog window that will appear, specify the folder, which will be indexed and all found images will be added to the gallery. You can also delete images from the gallery and physically delete image files from the disk. To do this, select the "Remove selected images from gallery" or "Delete selected image files" items in the context menu. To select multiple files, hold Ctrl and click each image you want to select.
. Then, select the folder you want to add to the gallery and enter the gallery name. The selected images will be indexed and preview images will be displayed on the screen. You can add or remove images from the gallery. To add images, invoke the context menu (by right-clicking on any of the images) and select the "Add image to gallery" item. Then you can add one or several images. To add a folder, select the "Add folder to gallery" item. In the dialog window that will appear, specify the folder, which will be indexed and all found images will be added to the gallery. You can also delete images from the gallery and physically delete image files from the disk. To do this, select the "Remove selected images from gallery" or "Delete selected image files" items in the context menu. To select multiple files, hold Ctrl and click each image you want to select.
Now let's look at the main feature of the program namely finding similar images. First of all you should tell the program how different the images can be. To do this, open the "Preferences" menu (![]() ).
).
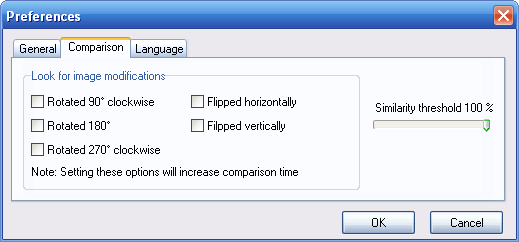
If you need to find exact duplicates, move the "Similarity threshold" slider to the right until it hits 100%. If you want to find similar images, decrease the similarity threshold. Note that it will increase the processing time. You can also mark one or several checkboxes in the "Look for image modifications" field if there are rotated or mirrored images. Now that we got to the Preferences window, it makes sense to describe other options.
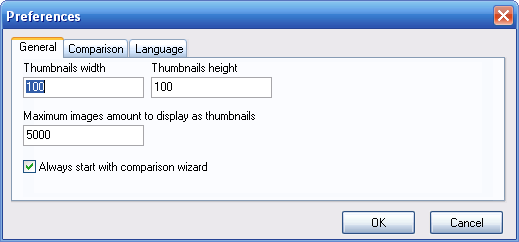
At the "General" tab you can specify preview size and the maximum number of preview images (this limit is implemented to make sure the program will not take too much memory). At the "Language" tab you can select any of the many interface languages.
So, all preferences are set - let's proceed to comparison.
The program supports two comparison modes: among a single gallery (![]() ) and between two galleries (
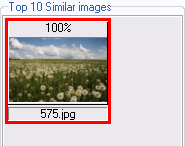
) and between two galleries (![]() ). In the first case, the program will compare each image in the gallery with all other images; in the second case, each image from the first gallery will be compared with every image in the second gallery but images within each gallery will not be compared. If you chose the two galleries mode, the program will prompt you to select the second gallery. If it doesn't exist yet, you should first create it before comparing it with the first gallery. In both cases, the program will prompt you to enter the name for the results file. In the future, you will be able to open this file and perform necessary actions to find images satisfying the criteria specified in Preferences. After the necessary computations are performed, the "Image pairs" tab will appear in the program window as well as the "Top 10 Similar Images" field. This field will display 10 images (if there are any) most similar to the currently selected one.
). In the first case, the program will compare each image in the gallery with all other images; in the second case, each image from the first gallery will be compared with every image in the second gallery but images within each gallery will not be compared. If you chose the two galleries mode, the program will prompt you to select the second gallery. If it doesn't exist yet, you should first create it before comparing it with the first gallery. In both cases, the program will prompt you to enter the name for the results file. In the future, you will be able to open this file and perform necessary actions to find images satisfying the criteria specified in Preferences. After the necessary computations are performed, the "Image pairs" tab will appear in the program window as well as the "Top 10 Similar Images" field. This field will display 10 images (if there are any) most similar to the currently selected one.
Now let's proceed to the "Image pairs" tab and see how we can process the comparison results.
This tab features two images and the table containing results. Above the images you can see the name of the gallery the images belong to. In the center, above the "Actions" the number is displayed, which shows how similar the selected images are. The "Actions" button invokes the menu with different functions to process results. Also, you can invoke this menu by right-clicking on any row in the table. The table itself has five columns - leftmost two columns correspond to the first image and rightmost two columns correspond to the second image. The "Similarity" column shows the ratio of similarity between the images. The remaining two columns are used to mark images for later processing. By default the list is sorted by similarity ratio but you can switch to the alphabetic sort by clicking on the column displaying image filenames. Also, the program has a very convenient feature, which can be used to simultaneously view two images in fullscreen mode. To do this, double-click any of the images or the corresponding table row. Also, in the program window you can see green arrows pointing to images
![]()
![]()
These arrows point to the image having higher quality. If the images are exact duplicates, the arrows will point to both images.
Now let's proceed to image processing. Images can be processed either in pairs or in groups. However, processing each pair takes a long time and is not different from processing images in groups. To process groups, you should first tell the program, which images should be included. To delete image pairs from the results, select them by holding the "Ctrl" key and clicking on each image. Then press the "Delete" key or invoke the "Actions" menu and select the corresponding item.
To perform all other actions, use the marks (the rightmost and leftmost column in the result table). You can also mark images in fullscreen mode (when viewing two images). To do this, simply click the image you want to mark.
To mark images, you can use the automatic mode (still, nothing prevents you from doing this manually). To select the automatic mode, invoke the menu by left-clicking on the column with marks.
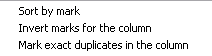
-
"Sort by mark" - this item is not used to set marks automatically but rather to make subsequent manual changes much easier. When you select this item, the sorting will be performed in ascending order, if you press it again the order will be changed to descending.
-
Clicking the "Invert marks for the column" item will clear the existing marks and set marks on those rows, which were empty. This is useful if you want to mark more than half of all images. You can mark those images you don't want to select and use this function.
-
"Mark exact duplicates in the column" - This automatically marks all images, which have similarity ratio of 100%.
Now that we have marked necessary images, let's see what we can do with them.
The "Actions" button will invoke the menu displayed on the screenshot:
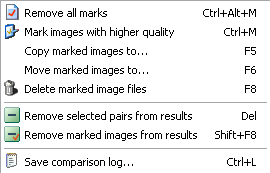
All functionality in brief:
- "Remove all marks" - this clears all marks.
- "Mark images with higher quality" - this marks those images, which have a higher quality (size, number of colors, resolution etc.) than the second image in the pair.
- "Copy marked images to..." - this will invoke the window prompting you to specify the folder where the marked images will be copied to.
- "Move marked images to..." - the same as the previous function but the images are moved instead of being copied.
- "Delete marked image files" - this physically deletes the image files.
- "Save comparison log..." - store the log with the comparison results to the Unicode text file.
As a conclusion, I want to note the program performs very fast in the exact duplicate search.
It is also recommended to read Image Comparer Tips and Tricks help article.