How to Cut and Join Video Without Re-encoding
Published: November 13, 2026 Author: Vitaly
You have a two-hour recording and need three minutes of it. A regular video editor will spend a long time saving those three minutes and will make the picture a little worse on the way. Neither is necessary. A fragment can be copied out of a video file as it is: in seconds, with exactly the original quality. Here is how it works and three ways to do it on Windows.
When you need this
- keep one incident from an hour-long dash cam recording;
- save the best moments of a game stream or a screen recording as separate clips;
- cut the ads out of a TV recording or the waiting out of a webinar;
- split a long video into parts to send or upload;
- trim the beginning and the end of a phone or action camera video.
In all these cases the picture itself is not changed. No effects, no titles, no new resolution: you only choose which parts of the file to keep. That is why re-encoding is not needed.
Why re-encoding is the slow and lossy way
A video file is a container (MP4, MKV, MOV) with compressed video and sound inside. When an editor saves a video, it normally unpacks every frame and compresses it again. This is re-encoding. It loads the processor or the graphics card for as long as the video lasts or longer, and since video compression throws away some detail every time, the copy is always a little worse than the original.
Cutting without re-encoding works differently: the program takes the already compressed data between two points and writes it to a new file. Nothing is unpacked, so nothing is lost, and the speed is limited only by your disk. This is also called lossless cut, stream copy or direct stream copy.
A simple test: if a program asks you for a quality, a bitrate or a codec before saving, it is going to re-encode. A lossless cut has nothing to ask about, because the video stays the way it was recorded.
The one catch: keyframes
A video file does not store every frame in full. Only keyframes are complete pictures, usually one every one or two seconds (in some recordings, one every ten seconds). The frames between them store only what has changed since the previous frame.
So without re-encoding a clip can start only at a keyframe: a frame from the middle cannot be shown without the keyframe before it. The end can be anywhere. This is the reason behind most complaints about lossless cutters:
- the clip starts a second or two earlier than the mark;
- the picture is frozen or broken for the first second while the sound already plays;
- after joining, a moment repeats at the place where two parts meet.
A good tool shows you where the keyframes are and tells you in advance where the clip will really start. That is the main difference between the three ways below.
Way 1: Bolide Movie Creator — marks on a ruler, no command line
Bolide Movie Creator is our video editor for Windows. Since version 5.6 it has virtual clips: you mark the fragments you need in a video, and the program saves them as separate files or joins them into one without re-encoding. The current version is 5.7.
- Download and install the program (Windows 11, 10, 8, 7). Drag your video into the Photo/Video Library, right-click its thumbnail and choose Create virtual clips....
- Find the start of the fragment: play the video, click on the ruler or step with the arrow keys. Press I to mark the start and O to mark the end. The clip appears in the list, and you can mark the next one. Mark as many as you need: a virtual clip is only two marks, it takes no disk space and the original file is never changed.
- Navigate by keyframes is on by default: the arrow keys and clicks on the ruler go straight to keyframes, so every mark you set is a clean cut point. A small key icon next to a time in the list confirms it. Turn the option off if you need to move frame by frame.
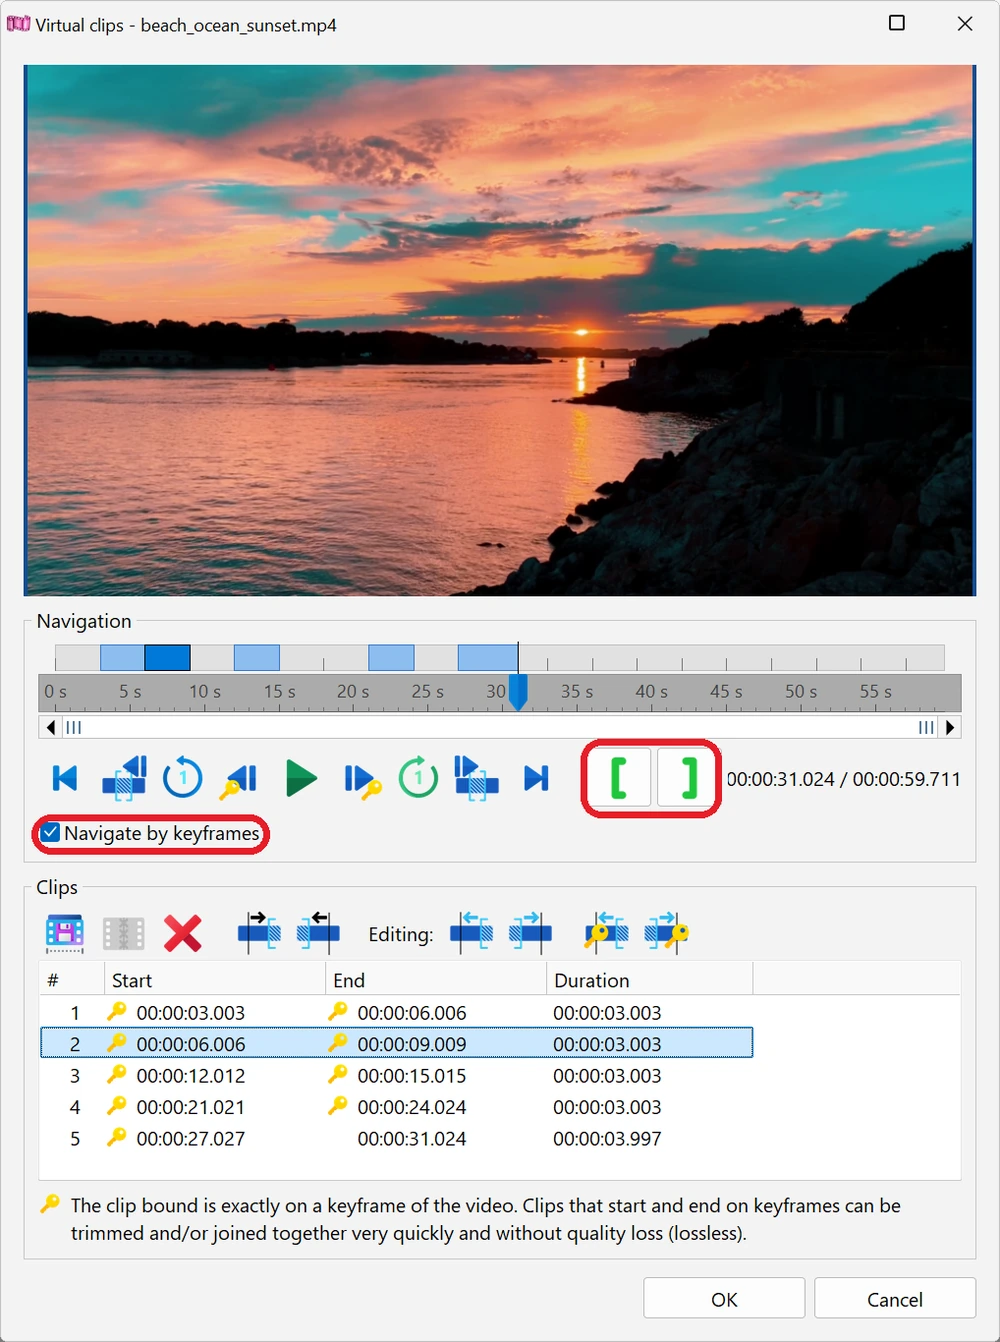
Five fragments marked in one video. Key icons show the bounds that are on keyframes
Save the fragments as separate files
Select the clips and click Save the clip as a file.... The Without re-encoding (fast, lossless) mode is the default. The video and all sound tracks are copied as they are, and the file keeps its type: MP4 and MOV give .mp4, MKV and WebM give .mkv, AVI gives .avi, WMV gives .wmv.
The Result column tells you what you get before you click Save: exact when the clip starts right at the mark, or how many seconds earlier it will start if the mark is not on a keyframe. There are no surprises after saving.
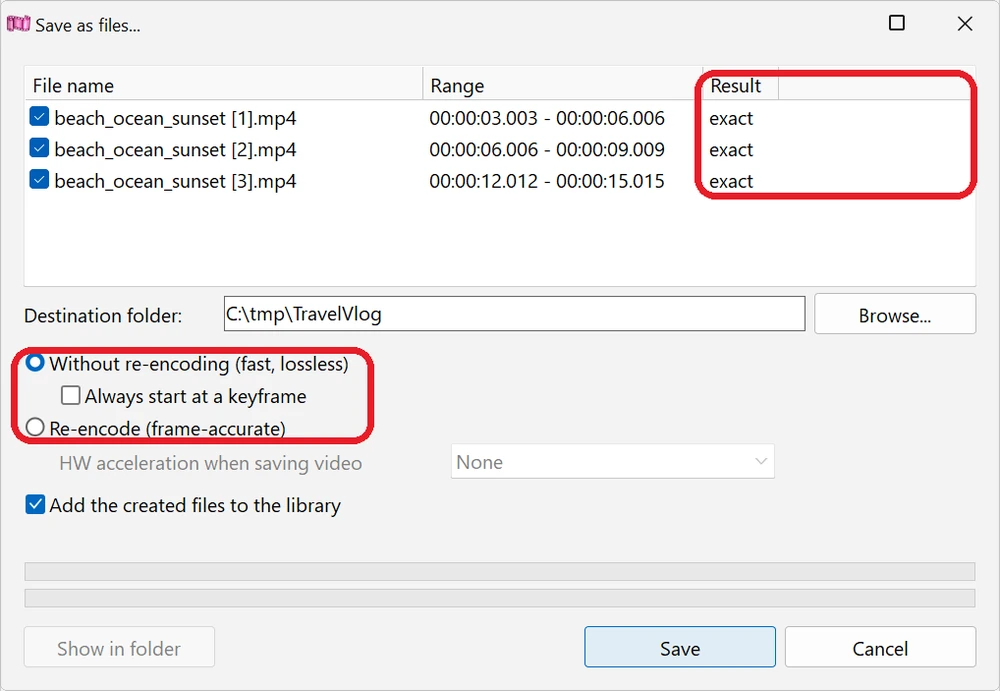
Two things here that simple cutters do not have:
- An exact start in MP4, even between keyframes. The frames from the previous keyframe stay in the file but are hidden, so the clip plays from your mark. Most players respect this. If yours does not, turn on Always start at a keyframe, and the file will honestly start a little earlier and play the same everywhere.
- A frame-accurate mode for the cases when lossless is not enough. Re-encode (frame-accurate) cuts exactly at your marks. The video keeps its size and frame rate, the bitrate is no lower than the original, the sound is still copied without changes, and the graphics card (NVIDIA, AMD or Intel) can do the encoding to make it faster.
Remove the middle: join the parts you keep
To cut ads, pauses or a failed take out of a recording, mark the parts you want to keep, select them and click Join without re-encoding.... The window plays the joined result right away, before anything is written. You can uncheck clips, change their order, and then click Join. The Note column warns you about every clip that does not start on a keyframe.
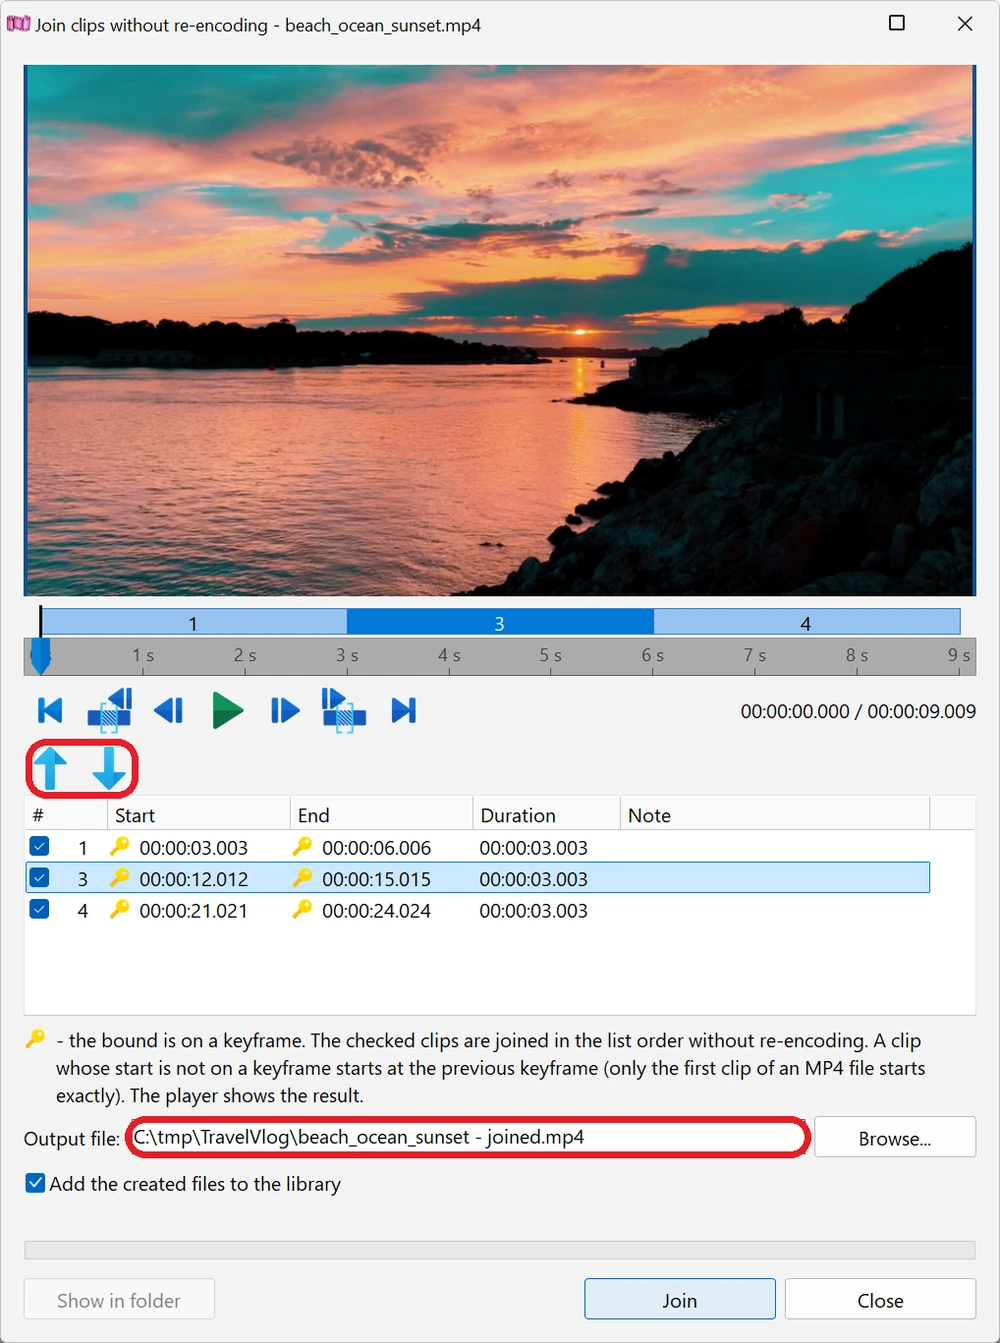
Three fragments of one file joined into a 9-second video. The player shows the result before saving
What to keep in mind. Joining without re-encoding works for fragments of one video file; different videos are joined on the timeline (with re-encoding) or with the tools below. Subtitles are not copied. The trial version saves one clip or makes one join per program session; marking clips and using them in projects is not limited.
The marked clips also stay in the library, and you can drag them onto the timeline to add music, titles and transitions later. The full guide has every button and keyboard shortcut.
Way 2: LosslessCut
LosslessCut is a free, open-source program for Windows, macOS and Linux that does only this: lossless cutting and merging. It is built on ffmpeg.
- Drag the video into the window.
- Find the start and press I, find the end and press O. Add more segments if you need several.
- Click Export. The segments are saved as separate files or merged into one, as you choose in the export options.
It can also merge several different files into one, as long as they were recorded with the same settings (the same camera and mode, for example). The interface has a lot of options, and cuts are made on keyframes: if your start mark is between keyframes, the result depends on the chosen cut mode, so check the beginning of every exported clip. Its smart cut feature for frame-accurate cuts is marked experimental.
Way 3: ffmpeg
If you are comfortable with the command line, ffmpeg does the same job with -c copy.
To copy the fragment from 0:10:00 to 0:12:30:
ffmpeg -ss 00:10:00 -to 00:12:30 -i input.mp4 -map 0 -c copy -avoid_negative_ts make_zero clip.mp4
-ss and -to before -i set the start and the end, -map 0 keeps all sound tracks,
-c copy copies without re-encoding. The clip will start at the nearest keyframe before 0:10:00.
Without -c copy ffmpeg re-encodes everything.
To join parts, list them in a text file list.txt:
file 'part1.mp4'
file 'part2.mp4'
file 'part3.mp4'
and run:
ffmpeg -f concat -safe 0 -i list.txt -c copy joined.mp4
To remove the middle of a video, cut the parts you keep with the first command and join them with the second. The files must have the same codec, resolution and frame rate. There is no preview: you find the times in a player, type them in and check the result afterwards.
Which one to choose
| Bolide Movie Creator | LosslessCut | ffmpeg | |
|---|---|---|---|
| How you work | Marks on a ruler with a player | Marks on a ruler with a player | Command line |
| Shows where the clip will really start | Yes, before saving | Shows keyframes on the timeline | No |
| Preview of the joined result | Yes | Plays the segments in turn | No |
| Frame-accurate cut when needed | Yes, re-encoding with the graphics card | Experimental | Yes, by hand |
| Joins different files without re-encoding | No, fragments of one file | Yes, with the same settings | Yes, with the same settings |
| Music, titles, transitions afterwards | Yes, it is a full video editor | No | No |
| Price | Free trial, paid license | Free | Free |
In short: ffmpeg is for scripts and for people who already use it. LosslessCut is a good free tool when you only cut and merge. Bolide Movie Creator is for those who want to see exactly what they will get and to continue editing in the same program.
What a lossless cut cannot do
Anything that changes the picture needs re-encoding: titles, music mixed over the sound, transitions, color correction, cropping, rotation, another resolution or format. So does joining videos from different cameras. The practical rule: first cut the long recording down to what you need without re-encoding, then edit only that. The video is compressed again once, at the very end, instead of twice.
Questions
Does cutting without re-encoding really lose no quality?
Yes. The compressed video and sound are copied from the original file byte for byte. The fragment looks and sounds exactly like the same place in the original.
Why does my clip start earlier than I marked?
Because the mark was between keyframes, and without re-encoding a clip can start only at a keyframe. Put the start mark on a keyframe, save to MP4 with an exact start, or use a frame-accurate mode with re-encoding.
How long does it take?
About as long as copying a file of the same size. A few minutes of 4K video are ready in seconds, whatever the length of the original recording.
Will the file size change?
The size follows the length: ten minutes cut from an hour-long 6 GB file take about 1 GB. The bitrate stays the same, so a lossless cut cannot make the video smaller per minute. For that you need re-encoding.
Can I join two different videos without re-encoding?
Only if they have the same codec, resolution, frame rate and sound format, for example two files from the same camera in the same mode. LosslessCut and ffmpeg can do it. Videos from different sources have to be re-encoded: put them on the timeline of a video editor and save as one video.
Which formats can be cut this way?
The usual ones: MP4, MOV, MKV, WebM, AVI, WMV with H.264, H.265 (HEVC), AV1 and other video. The container matters too: in Bolide Movie Creator a clip saved to MP4 can start exactly between keyframes without re-encoding, while other formats start at the previous keyframe.
👉 Download Bolide Movie Creator Step-by-step guide to virtual clips