Image Comparer Tutorial by Tom Morrissey
This tutorial is based on version 2.2 of Image Comparer with skin feature off
Table of Contents
Fundamental Purpose
The fundamental purpose of Image Comparer is to help its user in the management of image files. It does this by identifying the similarities between images and assisting the user in organizing the images based on these similarities.
:: top :: table of contents ::
Unique Features
What differentiates Image Comparer from other image comparison tools?
A broad range of Image formats are recognized and compared.
Most image comparison tools can only locate duplicate images of the same format, Image Comparer will identify the same images even if they are of differing formats (e.g., one is a JPEG and another is a Bitmap image).Can accurately compare images of differing sizes and resolution.
This enables the comparison of all of the images in your image collections.Provides convenient operations for managing your image files.
Within the context of the Image Comparer analysis results you can quickly update your collection of images (delete, copy and move files) based on the insight provided to you by Image Comparer.An extremely efficient image comparison algorithm enables exceptional performance scaling well with your computer's resources and image collection size.
Performance tuning controls are available for those users with large collections of images whose analysis and management might otherwise put excessive demands on their computer.
An intuitive and easy-to-use graphical user interface controls Image Comparer.
| :: top :: table of contents :: | |
Overview of how to control Image Comparer
When you open Image Comparer you will see an application window that looks something like what you see below. The area covering 2/3 of the left portion of the window contains the results of your image comparison analysis (initially this will be blank). The right 1/3 of your screen contains the controls for Image Comparer. These controls are our focus in this part of the tutorial.
There are three fundamental steps taken in using Image Comparer :
Select the image files of interest.
Perform your image comparison analysis which creates a database reflecting the analysis results.
Manipulate your image file collection (move, copy and/or delete files) based on the results of the image comparison analysis.
To select the image files of interest you use the "Compare folders" and "Compare groups" buttons.
Use "Compare folders" when you want all of the image files contained within the specified folder(s) to be compared against all of the other files in the same folder(s). Use "Compare groups" when you only want to compare the files in one folder (or set of folders) against the files in another folder (or set of folders). The key distinction is that "Compare groups" does not compare the files within a folder against the other files within that same folder, while "Compare folders" does. Tip: Use "Compare groups" whenever possible to improve performance.
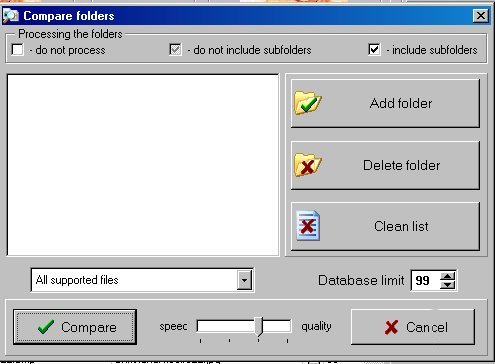
In the simplest case you may have a collection of image files in a folder and you want to compare all of these image files against all of the other image files in this folder. In that case you would want to use "Compare folders". When you select this button a dialog box looking something like this pops up which enables you to build a list of the folders of interest.
The "Add folder", "Delete folder" and "Clean list" buttons are your key tools in building a list of folders.
"Add folder" brings up a standard file browser dialog box. Once you have selected a folder (or set of folders) your "Compare folders" dialog will be updated with the selected folder.
The checkbox to the left of the selected folder controls how the folder should be handled as described in the legend at the top of the dialog box.
The default is to not include subfolders. This means that if there are any subfolders within the specified folder the subfolders will not be examined and image files contained in them will not be included in the analysis.
You can remove folders from the list by selecting them and then selecting the "Delete folder" button.
All folders can be removed from the list by selecting the "Clean list" button.
The drop-down selector whose default selection displays "All supported files" allows you to restrict the analysis to a particular type of image file format (e.g. JPG, BMP, TIF).
The "Database limit" defines how much information from the analysis is to be stored in the database. The value of the database limit indicates the minimum value % similarity to be stored in the database. In the screenshot above the value is "99". So only files whose similarity are 99% or greater will be stored in the database. This is an important control for improving performance for large collections of image files. Tip: Set this value as high as you can for your analysis purposes to keep your database size small and your performance high.
The "speed / quality" slider allows you to make a trade-off between accuracy and speed in the comparison analysis. If you place the slider more toward the "speed" side you will find that the analysis runs a little faster, but that the similarity assessment will be less accurate. Conversely, if you move the slider more toward the "quality" side your analysis will take longer but the similarity assessment will be more accurate. The performance benefits will generally only be noticable on very large databases and/or on less capable computer systems, so .... Tip: Unless you are terribly sensitive to performance leave the slider at the default position (shown above).
When you have finishing selecting the folder(s) of interest you'll proceed to the next step by selecting the "Compare" button.
You will then be taken to a "Creating database" dialog box. By default your database files are created in the Image Comparer program directory's DataBases folder. If this is the first time you've created a database for this collection enter a meaningful name (overwriting "New Folder") and select the "Create folder" button. If you are regenerating a database you can merely select the appropriate database folder from the file browser window. Once you have selected the appropriate database folder you should select the "Create database" button to begin the analysis and create the database.
A progress indicator will give you feedback on the program's progress in analyzing your collection of image files. Upon completion your database results will be summarized in the left-hand 2/3 of the program's main window -- your database viewer.
At this point you have completed the first two steps in using Image Comparer: 1) selecting the images of interest and 2) performing the analysis to create the database. Now you will want to consider the results and modify your collection of image files based on what you've discovered.
It is probably worth noting at this point that your database for this analysis has been saved in the database file you specified. So if you wanted you could exit Image Comparer at this point and when you return later the database you last had open will be automatically re-opened. Tip: Since Image Comparer does not have an explicit "Save Database" function you may want to exit and re-enter the program just to ensure that your database is safely saved.
Let's take a tour of the database viewer portion of the main Image Comparer window. The purpose of this part of the main window is to give you a view into the database you have created.
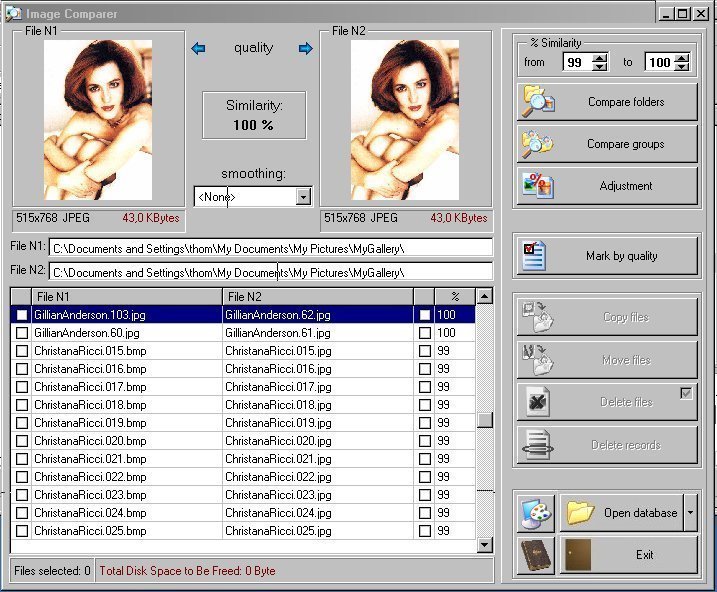
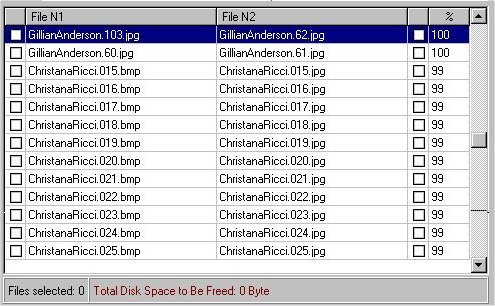
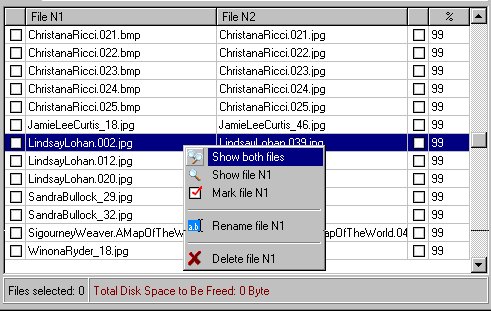
The bottom portion of the database viewer (shown below) is a record browser which allows you to review and select records and files within records of the database. The selected record is highlighted.
The currently selected record's information is shown in the upper portion of the database viewer (shown below).
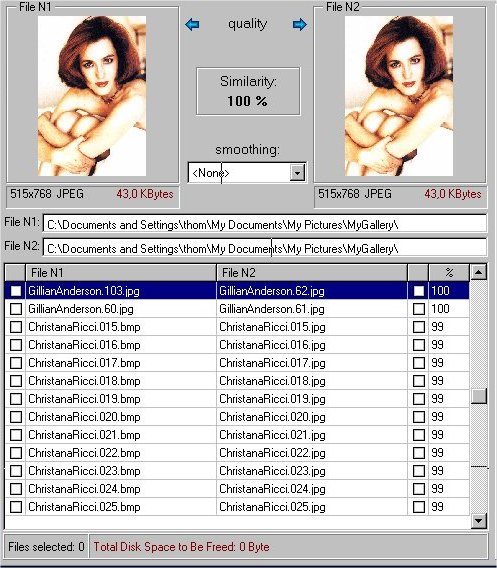
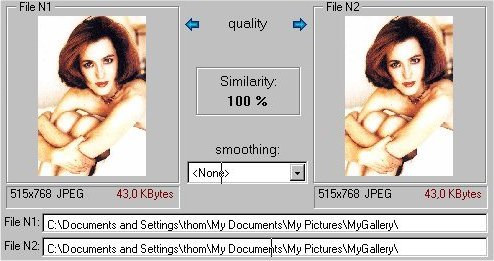
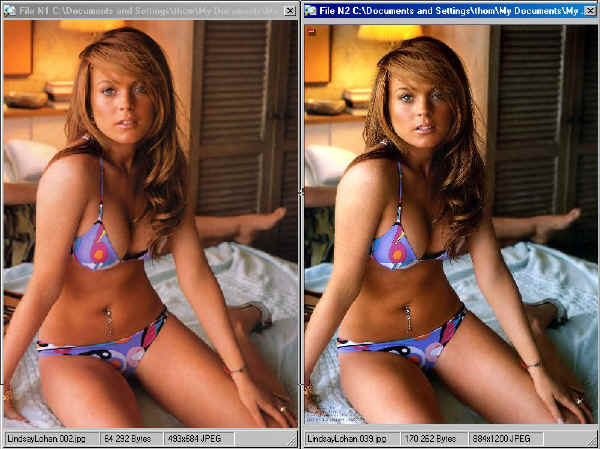
The files compared in the database record are referred to as "File N1" (on the left) and "File N2" (on the right). A thumbnail of each image file is displayed. (The "smoothing" drop-down is an advanced control enabling you to select the method by which the thumbnail is created. It impacts the quality of the thumbnail image. It has no impact on your images or on the comparisons made during the analyses. In general, unless you have a "golden eye" you can't tell the difference and all of the methods other than "<None>" will negatively impact the performance of your database viewing experience. Tip: Leave the "smoothing" set to "<None>".).
For image pairs which are not identical (i.e., similarity < 100%) the "quality" assessment at the top between the thumbnail pictures will indicate (by pointing to it) which image is of higher quality. "Higher quality" is defined as the image of higher resolution (generally the bigger image file). Your own review of the resolution and file size information below the thumbnail picture would quickly verify that. The information below the image also indicates the file format (e.g., JPEG, TIFF, BMP, GIF). The very bottom of this upper portion of the database viewer provides you with the complete file path information for each file.
The record browser portion of the database viewer (see below) contains check boxes on each side where you can select "File N1" and/or "File N2". When you select a file the status information at the bottom of the record browser indicates how much disk space would be freed up if you chose to delete all of these files.
Before moving on to actually deleting, copying or moving your files let's look at one further way you can optimize your database viewing and manipulation experience by limiting the number and nature of the records you are dealing with in the database. You will recall that when you created the database you were allowed to define a "database limit". In our example we limited the database creation to include only records with similarity of 99% or greater. As you can see in the record viewer above there are records with similarities of both 99% and 100% (the higher percentage similarities listed at the top). You can further limit what you are viewing of the database by controlling the "% Similarity" on the top-right portion of the main Image Comparer� window.
If we would change the range to be from 100% to 100% we would exclude from consideration (and not see) the records of 99% similarity. Likewise if we adjusted the "% Similarity" to view to be 99% to 99% we would no longer see the 100% similarity records. They would still exist in the database, we just wouldn't have to deal with them at this time. This is done prior to selecting any records/files by modifying the values in the "% Similarity" control panel and then selecting the "Adjustment" button"

You'll notice that once you've selected a file/record the "Adjustment" button is disabled (dimmed out).
Tip: When dealing with large databases limit your "% Similarity" to improve the performance of your database viewing experience.
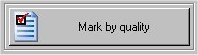
Another convenient control that can be utilized prior to selecting any files/records is the "Mark by quality" button/feature.
Selecting this button will cause the file of the lower quality to be marked for all of the available records. Tip: A cautionary note here -- it is advisable to review the selections for your set of images to see if the selection is appropriate for you, especially if your subsequent action would be to delete the selected/marked files.
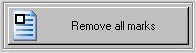
You will notice that as soon as any file/record is selected the "Mark by quality" button turns into the "Remove all marks" button.
And, as the name implies, selecting the "Remove all marks" button will cause all marks to be removed/cleared.
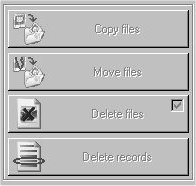
After any file/record has been marked the following operation can be performed on the files (or records): "Copy files", "Move files", "Delete files" and "Delete records". The buttons shown below initiate these operations. Until a file/record is marked these buttons are disables (dimmed as shown on the right below).
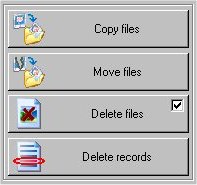
"Copy files" and "Move files" both bring up a "Select folder" dialog browser which contains a standard file/folder browser. Once you have selected your target file and hit the "Ok" button in the "Select folder" dialog your marked files will be copied/moved as you have requested. In the case of "Move files" the database must be adjusted to account for the absence of the marked files in their old location.
"Delete files" will, as the name implies, delete all of the marked files and then adjust the database to account for the absence of the marked/deleted files. Note that the checkbox in the upper-right corner of the "Delete files" button is an active control. When checked (the default) the files that are deleted are sent to your Recycle Bin (and hence recoverable until you empty your Recycle Bin. When not check the files are permanently deleted.
"Delete records" only affects the database record and does not affect the files contained in the record. If you select "Delete records" the database record containing marked files will be removed from your database. This is convenient when dealing with large databases and you have database entries for which you do not wish to otherwise delete, copy or move the files it has identified. It helps remove clutter in your database and simplify your database review.
At the bottom right portion of the main Image Comparer window are a collection of control / information functions.
The "skins" button is used to select from a collection of "skins" or color schemes for the Image Comparer user interface. Selecting the "skins" button brings up a file browser dialog defaulting to the location of the skins provided with the Image Comparer. Clicking on one of the files on the left hand browser pane causes a preview of the "skin" in the preview pane at the right. Selecting no file causes your default Windows color scheme to be used.
Selecting the "About" button provides you information on the program including version information, license information and useful web links.
The "Open database" button enables you to open previously created / manipulated databases enabling you to overlap your work on multiple Image Comparer projects. Selecting the "Open database" button brings up a standard file/folder browser dialog defaulting to the location where Image Comparer stores its databases. You can then navigate to the database of your choice. Selecting the down-arrow button on the far right of the "Open database" button pops up a list of the most recently used Image Comparer from which you can select.

Selecting the "Exit" button is the preferred method of terminating your work with the Image Comparer program.


| :: top :: table of contents :: | |
Example usages of Image Comparer
The following are some examples of how Image Comparer might be used in certain projects / endeavors. These are merely examples. The possibilities are endless.
Genealogy
In this scenario you are gathering images from many different sources. Some are sent to you by relatives. They get them from scanned snapshots or from scanned pictures in periodicals. You may also gather them yourself from similar sources. But, since there are so many coming in from so many places in so many forms and formats it is easy to end up with similar or duplicate images.
Image Comparer can help you remove the duplicates and select the best versions of the images for your genealogy project.
In this case it may be useful for you to separate your images into a least a couple of major batches for efficient processing by Image Comparer. One batch would be those that have already been compared against all of the others for similarities and have been appropriately processed leaving no real duplicates in that set. New images are placed in another batch. You could then periodically run Image Comparer using "Compare groups" against the two batches. Once any similarities have been processed you can then move the new batch into the "processed" batch/folder.
Of course you could just organize them in a way that is most appropriate for your project and then use "Compare folders" on all of the folders containing the image files of interest. This would work fine, but might take more time and resources as it would require a larger database.
In either case Image Comparer would be a valuable tool in removing the duplicates and selecting the best versions of the images for your genealogy project.
Web image harvesting
In this scenario you are collecting images from the web for your personal viewing pleasure. As you visit web sites that match your particular interests you find images that are particularly striking and you want to save copies on your computer for your personal viewing pleasure at a later time.
As with the genealogy scenario described above you have new pictures coming in on a regular basis, some which may be similar or identical to pictures you already have in your collection. For convenient and efficient processing by Image Comparer you organize your image files into those that you have already processed by Image Comparer and those that have not yet been processed. This allows you to use "Compare groups" rather than "Compare Folders" most of the time.
Web sites
Webmasters for image-heavy web sites will find Image Comparer useful for weeding out multiple copies of the same image at different resolutions that may be orphaned as the web site evolves. Likewise, depending upon how new images are added to the web site, it is often common that the same or similar images are posted to the web site under different names. In all of these cases Image Comparer can help identify and remove the redundant image files and save on valuable web site disk space.
| :: top :: table of contents :: | |
Getting the most of Image Comparer
Advanced Image Comparer controls
Keyboard navigation / marking in record browser
While in this view you can navigate up and down through the list of records using the "up arrow" and "down arrow" keys respectively. Alternatively, if you have a scroll mouse the scroll wheel will generally perform a similar function (though the granularity of your scroll rate might make it a bit challenging to step through the images if your scroll wheel's granularity is greater than one up/down arrow increment per scroll wheel increment).
You may also take larger navigational steps using the "PgUp" and "PgDn" keys. Each step is equivalent to a page of records in the record browser.
"Home" and "End" keys likewise work as you would expect -- taking you to the first and last entry in the current viewable range of the database respectively.
The "CTRL - left arrow" key will toggle the mark for the image on the left (File N1) while the "CTRL - right arrow" key will toggle the mark for the image on the right (File N2).
Full screen database record viewing
When you double (left) clicking your mouse over a record in the record browser portion of the database viewer you bring up a full-screen, side-by-side view of the two images in the selected record. Each image is displayed in a separate window. The path to the file is in the title and the name of the file, it's size, resolution and file type are listed in the status bar at the bottom of the window.
From within this view you can toggle the mark for the images (equivalent to checking or unchecking the box in the record browser portion of the database viewer) in one of two ways:
The "CTRL - left arrow" key will toggle the mark for the image brought up on the left (File N1) while the "CTRL - right arrow" key will toggle the mark for the image brought up on the right (File N2).
Alternatively, clicking the left mouse button will toggle the more for the image brought up on the left (File N1), while clicking the right mouse button will toggle the mark for the image brought up on the right (File N2). Please note: this behavior will likely change in the next revision of the product so that the position of the mouse is taken into account and the image selected by the left-click of the mouse is defined by the image "under" the cursor position and not by which mouse button is clicked.
In either case when the image is marked a mark-glyph will be super-imposed over the marked image.
While in this view you can navigate up and down through the list of records using the "up arrow" and "down arrow" keys respectively. Alternatively, if you have a scroll mouse the scroll wheel will generally perform a similar function (though the granularity of your scroll rate might make it a bit challenging to step through the images if your scroll wheel's granularity is greater than one up/down arrow increment per scroll wheel increment).
You can exit this view by hitting the "ESC" key or by closing either of the image windows using the x-box window control.
Tip: For improved performance set your "smoothing" algorithm to "<None>". The smoothing algorithm is a used in generating the thumbnail images. In this view the thumbnails are slightly larger than in the normal view.
Context-dependent menu (mouse right-click) in record browser
When your mouse is over a record / file in the record browser portion of the database viewer a mouse right button click will bring up a context-dependent drop-down menu.
Selecting "Show both files" brings up a full screen database record view for the selected record. This is equivalent to double (left) clicking your mouse over the record.
In the following descriptions "Nx" refers to "N1" if you made your selection over the left portion of the record dealing with "File N1" or "N2" if you made your selection over the right portion of the record dealing with "File N2".
Selecting "Show file Nx" will launch your default image editing tool (or image display tool if you don't have an image editing tool) to open the selected image file.
Selecting "Mark file Nx" will mark the selected image file. It isn't clear why you'd use this rather than just ticking the check box though.
Selecting "Rename file Nx" will bring up a dialog window for you to enter the new file name and rename the file to the specified name when you hit the "Ok" button in the dialog window. The database is then resynchronized.
Selecting "Delete file Nx" will delete the selected file and resynchronize the database accordingly. Tip: If you have multiple files to delete it would be more efficient to mark the files and then use "Delete files" on the batch, since the database needs to be resynchronized in response to the file deletions and it is more efficient to do that once per group, rather than each time a file is deleted.
Performance Tips
As a general principal your performance will be better when dealing with smaller databases. So whatever measures you can take to toward that end will improve your performance. Of course, it may be best to just work with whatever size databases are convenient until you notice the performance being an issue. If your system's resources are great enough relative to your database sizes there may in fact be no performance issues for you. But if performance considerations become interesting to you the following tips will likely be of use:
Use "Compare groups" (rather than "Compare folders") whenever possible.
Set the "Database limit" value used in "Compare folders" and "Compare Groups" as high as you can for your analysis purposes to keep your database size small and your performance high.
When dealing with large databases limit your "% Similarity" (on the database viewer / main view) to reduce the number of database records with which you are dealing at any one time.
Leave the "smoothing" (on the database viewer / main view) set to "<None>".
| :: top :: table of contents :: | |
System Requirements
Image Comparer performance scales directly as function of your system's processor speed and available memory. Your system should have at least a 600Mhz processor and should have at least 256Mb of memory. As your database size increases in proportion to the number of image files you are comparing you will find there to be a greater demand on your system and performance may degrade. There are of course limits to the number of files that can be compared relative to your system's resources and extremely large sets of files may not be able to be processed. The limit is defined by your system's available memory. To give you a feel for when limits might be reached a 800Mhz system with 250Mb of memory ran into difficulties when performing a "Compare folders" on a set of folders with approximately 48,000 images. So you can see that even a fairly low-performance system configuration (by today's standards) can still handle a large number of image files.
| :: top :: table of contents :: | |